Integrating static and animated 3D content into mobile augmented reality (AR) experiences is a highly effective way to enhance the user’s immersion and engagement. However, creating 3D objects for AR can be quite daunting, especially for those who lack experience in 3D modeling. Unlike adding video or photo AR layers, generating 3D objects requires technical expertise and specialized software.
However, we are happy to lend a hand – this tutorial is intended to guide you in creating 3D content for mobile augmented reality by using Blender, a free and open-source 3D creation software. The following post provides a detailed, step-by-step process on how to use Blender to generate 3D objects that can seamlessly integrate into Overlyapp.
What makes Blender an excellent choice for augmented reality?
With its powerful suite of 3D modeling tools and open-source availability, Blender is an excellent choice for developers and designers looking to create mobile augmented reality content without breaking the bank. Blender offers a range of features that are on par with expensive 3D modeling software like Cinema 4D, 3DS Max, and Maya. Unless you have already invested in a paid software, there is no significant advantage to opting for a costlier alternative over Blender.
Over the last few years, Blender has made remarkable strides in terms of expanding its capabilities and features. It is now widely recognized as an industry-standard tool for creating 3D content. Thanks to its user-friendly interface and comprehensive feature set, Blender has become a popular choice among both novices and experts seeking to leverage it for AR.
Preparing 3D objects for use with Overly’s 3D editor
To ensure that your 3D objects are compatible with Overly’s 3D editor, it’s important to prepare them properly. If your objects don’t have any movement or animation, they can be imported in the OBJ format.
However, if you have more complex scenes with animations, you will need to export them in the glTF or FBX format. The glTF format is particularly well-suited for web and mobile applications, as it’s optimized for fast loading and rendering.
To create a 3D object for Overly’s 3D editor, you’ll need to export your 3D models and animations from Blender and then upload this 3D object to Overly’s 3D editor, which has a built-in file optimization tool.
Understanding the building blocks of 3D models: polygons and meshes
The initial stage of 3D development is modeling, where objects are actually created in three dimensions. Blender offers multiple techniques for modeling, with “mesh modeling” being the most widely used and fundamental approach.
What is a mesh?
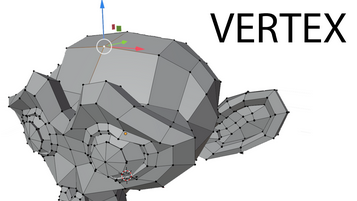
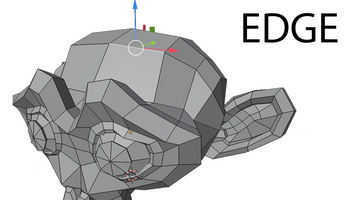
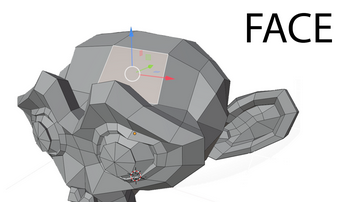
In 3D modeling, a mesh refers to a grouping of vertices, edges, and faces that define the shape of an object.
A vertex, which can also be referred to as a point, is a singular location in space. The plural of vertex is “vertices”.
An edge is a straight line that connects two vertices, defining the line segment between them.
A face, also known as a polygon, is a flat surface enclosed by edges. It is defined by three or more vertices connected by edges.
What is a polygon?
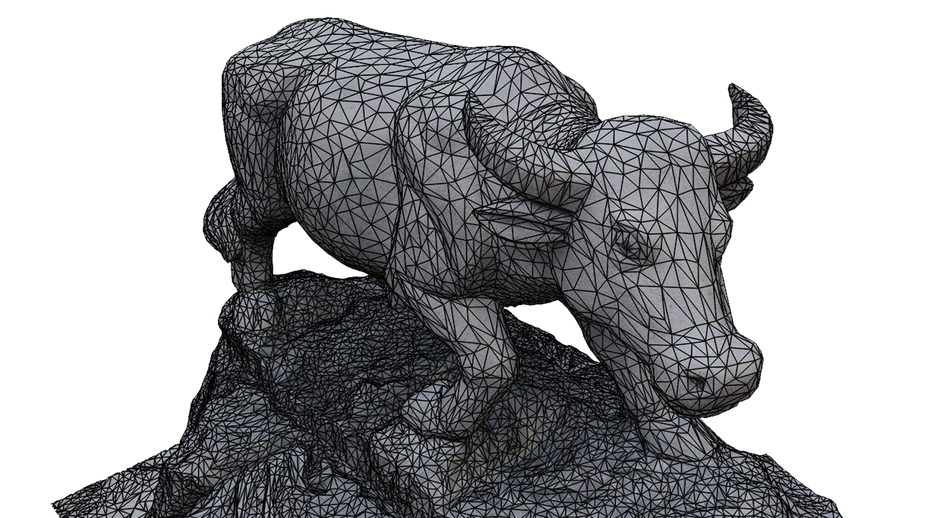
Polygons are geometric shapes formed by connecting three or more vertices with straight edges in three-dimensional space. Vertices, edges, and faces are the basic components of polygons, with the face referring to the interior region of the polygon. Modeling with polygons typically involves using three-sided shapes called triangles or four-sided shapes called quads.
A polygon face is defined by the area enclosed by three or more vertices and their associated edges. Many connected faces create a polygon mesh, also known as a polyset or polygonal object, which is used in the creation of 3D polygonal models.
When creating augmented reality models and scenes in Blender, there are no specific requirements regarding the number of polygons needed. However, it’s important to remember that people may access this content on various devices, some of which may be older. To ensure optimal performance, it’s best to keep the number of polygons low.
While modern devices can easily handle 600 thousand to 1 million polygons, it’s recommended to limit scenes to 250 thousand polys for mobile devices.

Preparing animations
Object animations can be created in several ways, including object transformation, which involves changing an object’s location, size, and rotation along the x, y, and z axes. Object rigging is another method that is useful for animating complex objects such as humans, animals, and mechanical devices that have multiple parts.

As an example, a recent project by Overlyapp utilized a rigging system to simulate the movement of butterfly wings.
To create animations, keyframes are marked in the timeline to indicate where changes to an object’s bone or armature occur in the x, y, and z space.
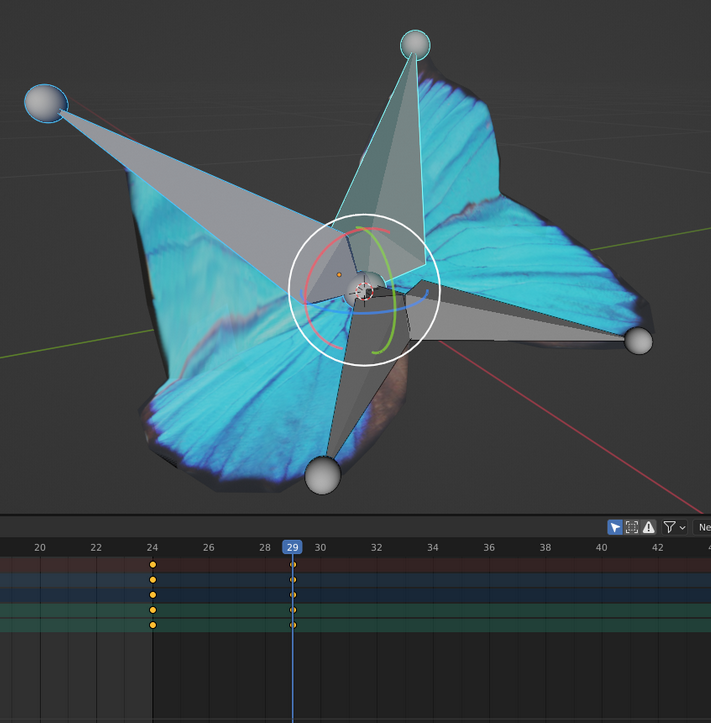
The Timeline is the main tool used for creating animations, and animation titles and their association with specific objects are added in the Dope Sheet tab, which can be accessed through the Action Editor view.
Understanding color and light differences between rendered visualization and AR: textures, materials, and colors
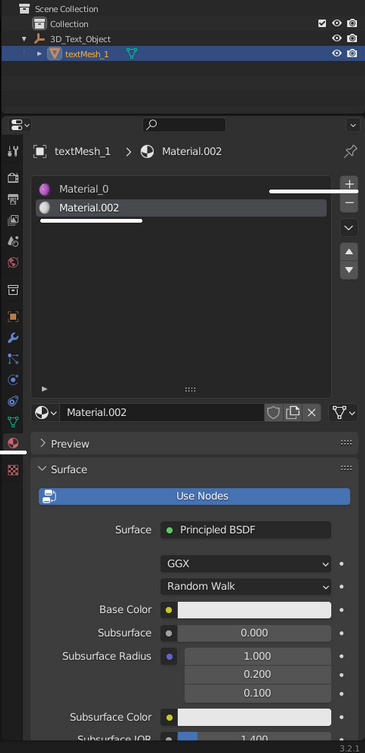
Adding colors to an object in Blender is a simple task. You can select a material and assign a color to it. However, if you wish to incorporate additional visual elements such as textures, symbols, or color variations, you will need to create materials.
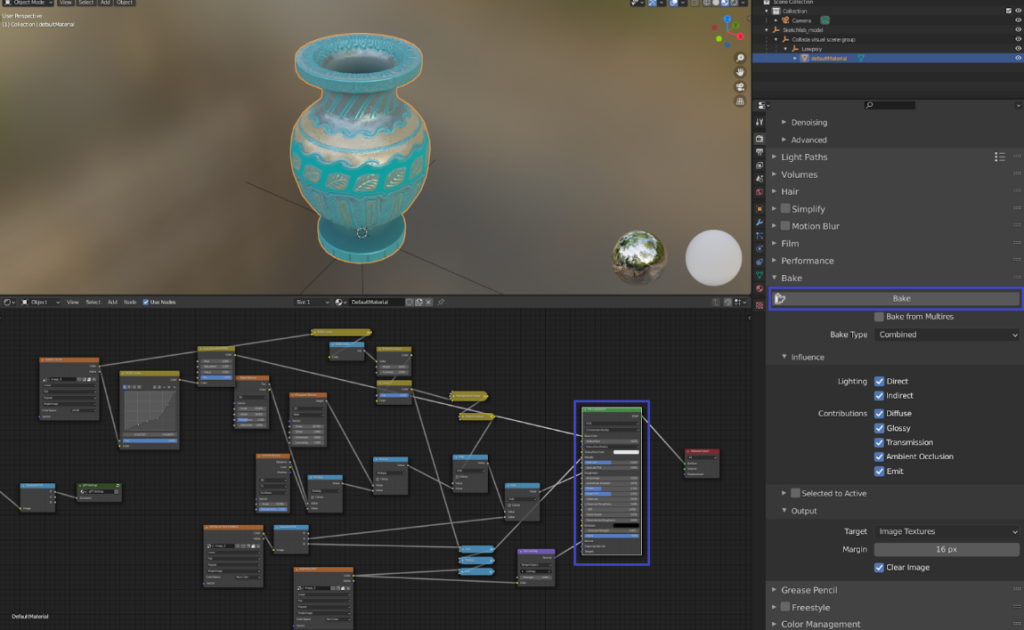
Blender provides an option to create textures and bake them onto an object in the form of .JPG or .PNG. When creating textures, it is important to ensure that lightning and shadows from the scene are not baked, as they will conflict with Unity project lights. Therefore, it is recommended to choose the bake type as Diffuse, and leave only the color option turned on.
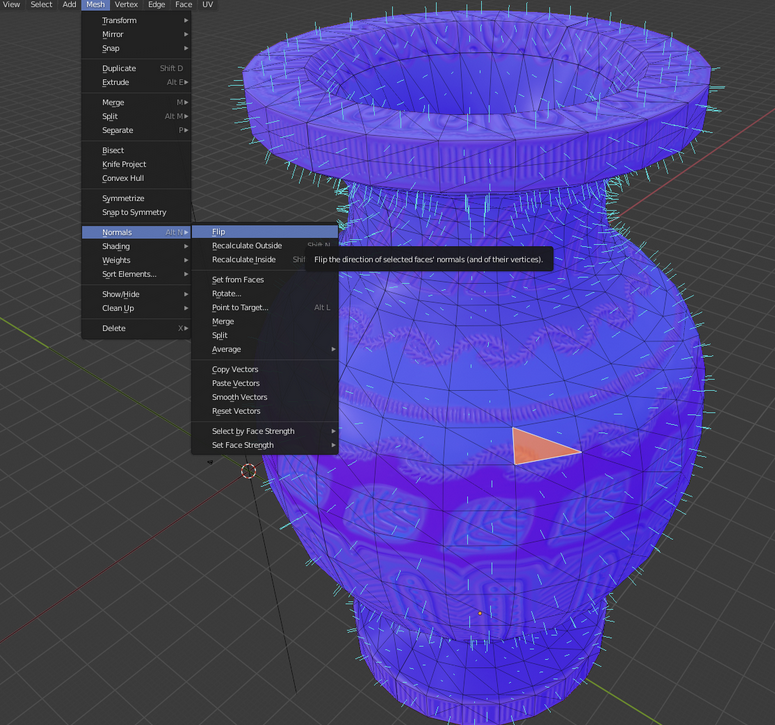
Before baking the texture, it is essential to check if the normals are facing the correct direction. If they are not, some polygons will appear black or transparent in the Overlyapp environment. Twisting the normals around can fix this issue. Once the texture is baked, it can be assigned to a specific object, and a new material can be created with the attached texture.
Keep in mind – when viewing a 3D model on platforms such as Sketchfab, Blender, or Unity 3D, the appearance may vary due to differences in rendering systems. These systems process elements such as lighting, textures, and shadows in unique ways, resulting in slight differences in the final look of the model.
However, by utilizing glTF or GLB formats and Universal Material Layer (UML) materials, the model’s appearance can be standardized, ensuring a more consistent visual output across various platforms.
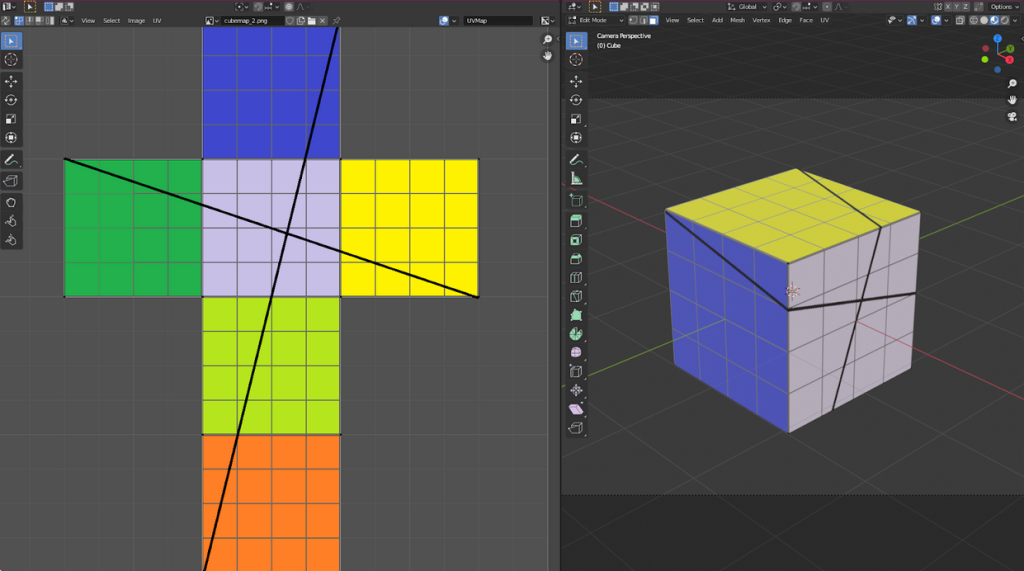
A guide to UV mapping
Creating a UV coordinate system map is essential before texturing objects in 3D modeling. Although it may sound daunting, it’s a straightforward process. Simply put, it’s a 2D image that shows where textures appear on a 3D object. It’s like creating a paper layout for a cube that you later cut, fold, and glue. Once the layouts are created, textures can be designed for each object and imported to Overlyapp.
In addition to the method mentioned earlier, you can also use programs such as Photoshop to create textures. Various textures are available that can make materials glossy, transparent, rough, or similar. Each texture should be saved as a .JPG file. For example, this is useful for creating reflections for windows or highlighting different aspects of a building’s facade.
In Blender, there’s no need to create lights or cameras, as the prepared files can be imported directly into Overly’s 3D editor.
Understanding file formats and the advantages of glTF
After creating the animation, it must be exported in either glTF (.gltf/.glb), FBX or OBJ format. These file types allow for the saving of objects, textures, animations, and armatures.
The glTF file format has become increasingly popular in the industry. Its design emphasizes compact file size, fast loading, run-time independence, and complete 3D scene representation.
Prior to glTF, the two main formats for transmitting 3D model data between creation tools and engines were FBX and OBJ. FBX has many dated features, and its proprietary nature and large C++ SDK prevent direct loading in a web browser. Regarding the OBJ format, it has limited features and is inefficient in terms of storage space and read/write speed.
Some industry experts anticipate that the usage of glTF will keep growing, leading to it potentially becoming the standard format for exchanging assets within the industry. Given Blender’s potential for augmented reality, it could play a significant role in bringing about this outcome.
Finally, when exporting, it’s important to only include mesh and armature. It’s best practice to provide a texture map along with the file submission to Overly to ensure smooth integration.
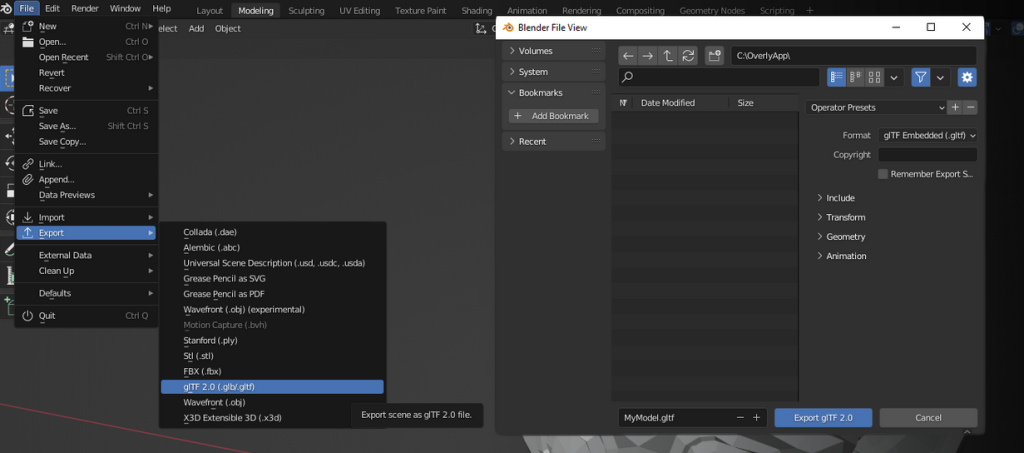
Step-by-step guide: exporting your 3D model from Blender in glTF Format
To export your 3D model from Blender in the glTF format, follow these steps:
- Open your 3D model in Blender.
- Ensure that your model is properly set up, including materials, textures, and UV maps.
- Click “File” in the top-left corner of the Blender interface, and select “Export” from the dropdown menu.
- Choose “glTF 2.0 (.glb/.gltf)” from the list of export formats.
- In the export options panel on the right, choose either “GLB” (binary format) or “GLTF” (text format) as your preferred format. GLB files are more compact, while GLTF files are more easily readable by humans.
- If necessary, configure additional export settings, such as applying modifiers, selecting objects to export, or adjusting animation settings.
- Select the destination folder for your exported file and give it a name.
- Click “Export” to save the file in the selected format.
Troubleshooting guide: What to do when encountering issues with your 3D file
As you work with 3D content in Blender, you may come across issues like broken texture appearances, but these are usually due to easily fixable human errors. Here are some of the most common scenarios:
- Check for errors: Re-import the exported glTF file into Blender to see if it displays correctly. If not, review the Blender console for any error messages, as they might provide useful information about the problem.
- Verify materials and textures: Ensure that materials and textures are correctly applied to the model in Blender. Missing or improperly assigned textures can cause broken appearances. Also, make sure you’re using supported material types for glTF exports.
- Inspect UV mapping: Double-check your model’s UV mapping to ensure the textures are mapped correctly to the geometry. Incorrect UV maps can lead to distorted or misplaced textures on the exported model.
- Apply transformations: Before exporting, apply any transformations (scale, rotation, location) to the model by selecting the object, pressing Ctrl+A, and then choosing “All Transforms.”
- Apply modifiers: If your model has any modifiers, like Subdivision Surface or Boolean, apply them before exporting to ensure the correct geometry is included in the exported file.
- It’s also a good practice to double-check your export settings.
Taking mobile augmented reality to the next level with Blender and Overlyapp
As attested by this guide, Blender is a powerful 3D modeling and animation software that offers numerous advantages for creating mobile augmented reality projects.
Its versatility allows developers to create complex 3D models and animations that can be exported to mobile AR platforms like Overlyapp. The software’s compatibility with the glTF file format ensures efficient compression of models and animations for mobile devices while maintaining their high quality.
With an extensive selection of plugins and add-ons for AR-specific content, Blender is a favored choice for augmented reality developers aspiring to create immersive and top-notch AR experiences for mobile devices.